VueJs Lifecycle Hooks: A Look Into the Lifecycle of a Vue App

Created on April 8, 2022.
When a new Vue component instance is created, it goes through a series of initialization steps such as data observation, template compilation, mounting data to DOM, and data updates. Through these initialization steps, Vue invokes functions - “lifecycle hooks”, that give users the opportunity to add custom code at specific points of its lifecycle. We have been exposed to one of these lifecycle hooks in previous code examples, the mounted function.
In this post, we will explore VueJs’ lifecycle, learn about the different lifecycle hooks, and how we can use them in our Vue apps. We will be mainly focusing on the lifecycle hooks mainly used with the options API, Vue’s API that we have been focussing on up to this moment.
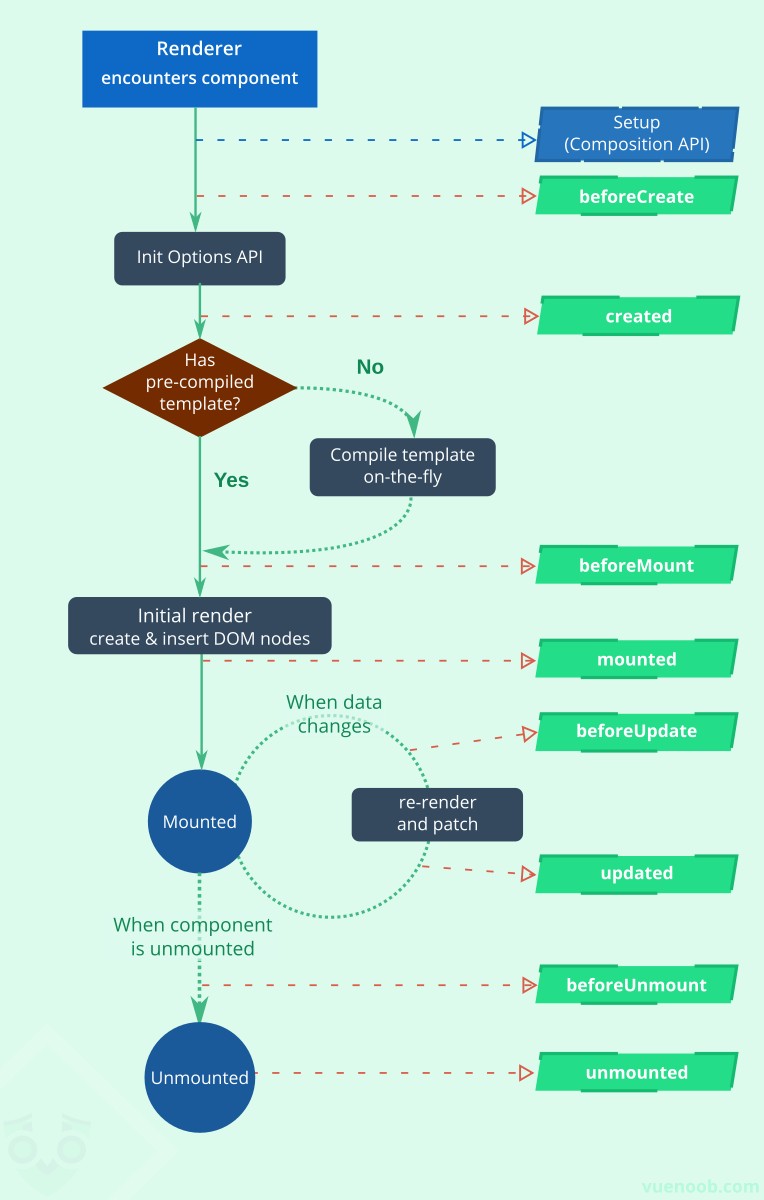
The following diagram demonstrates VueJs’ lifecycle. It illustrates at what points different lifecycle hooks are triggered. Use this diagram as a reference to grasp the explanations below.
Accessing Data inside Lifecycle hooks
In the options API, in all hooks besides beforeCreate this context points towards the current active Vue instance, meaning we can have access to variables inside data property and functions inside methods through this.VARIABLE and this.METHOD() respectively.
This means you should avoid using arrow functions when declaring lifecycle hooks, as you won’t be able to access the component instance via this if you do so.
Let’s take a look at the hooks.
The beforeCreate hook
This hook is called immediately when the instance is initialized after props have been resolved. It is called before the data() and computed options. Inside this hook, we have no access to data from the data property, computed properties and methods.
We can use the beforeCreate hook as follows.
let app = Vue.createApp({
  beforeCreate(){
	// code
  }
})Note: The setup() hook of Composition API is called before any Options API hooks, even beforeCreate().
The created hook
This hook is called after the reactive data, computed properties, methods and watchers have been set up before the DOM is mounted. We have access to the state of our Vue app in this hook onwards but not the DOM.
This is an ideal hook to initialize data that depends on asynchronous functions but which does not modify the DOM.
let app = Vue.createApp({
  created(){
    // Code goes here
  },
})
The beforeMount hook
This hook is called when Vue has finished setting up the component’s reactive state, just before the creation of DOM nodes. It is invoked when Vue is about to execute its DOM render effect for the first time.
let app = Vue.createApp({
  beforeMount(){
    // Code goes here
  },
})
The mounted hook
When this hook is called, all of Vue’s reactive and synchronous child components (to be learned in a future post) have been mounted, and Vue’s DOM tree has been created and inserted into the parent container.
We frequently use this hook in a typical Vue app as it allows us to perform side effects that depend on access to the rendered DOM.
We’ve seen how this hook is set up in the previous posts.
let app = Vue.createApp({
  mounted(){
    // Code goes here
  },
})
The beforeUpdate hook
This hook is called whenever Vue is about to update its DOM tree after a reactive state change, just before the DOM change has occurred. Vue’s state can be safely modified inside this hook.
let app = Vue.createApp({
  beforeUpdate(){
    // Code goes here
  },
})
The updated hook
This hook is called after Vue has updated its DOM tree in reaction to a change in its reactive state. Unlike in the beforeMount hook, it’s not safe to modify Vue’s state inside this hook as it can lead to an infinite update loop.
When dealing with Vue components, a parent component’s updated hook is called after that of its children.
let app = Vue.createApp({
  updated(){
    // Code goes here
  },
})This hook is called after any change in the DOM caused by a change in state. To avoid listening to all possible DOM updates inside this hook when trying to access the DOM after a specific change in Vue’s state, use nextTick() instead.
The beforeUnmount hook
This component is called before a component’s instance is about to be unmounted. When this hook is called, the component instance is still functional. We will see examples on how to use this hook when dealing with Vue components.
The unmounted hook
This hook is called when a component has been umounted. This means that all of its child components and reactive effects have been stopped.
Use this hook to clean up all side effects you create inside a Vue component, such as timers and DOM event listeners.
Use the following example to grasp the concepts we’ve learned here.
<div id="app">
  <h1>Vue Lifecyle Hooks</h1>
  <ul>
    <li>beforeCreateVar -- {{ beforeCreateVar }}</li>
    <li>createdVar -- {{ createdVar }}</li>
    <li>beforeMountVar -- {{ beforeMountVar }}</li>
    <li>mountedVar -- {{ mountedVar }}</li>
    <li>someUpdate -- {{ someUpdate }}</li>
  </ul>
  <button @click="updateState()">Update State</button>
</div>

<script src="https://unpkg.com/vue@3"></script>
<script>
  let hooks = Vue.createApp({
    data(){
      return {
        beforeCreateVar: "No Changes!",
        createdVar: "No Changes!",
        beforeMountVar: "No Changes!",
        mountedVar: "No Changes!",
        someUpdate: 0,
      }
    },
    beforeCreate(){
      console.log("1. beforeCreate");
      // this.updateState();
      this.beforeCreateVar = "changed!";
    },
    created(){
      this.createdVar = "changed!";
      console.log("2. created");
    },
    beforeMount() {
      this.beforeMountVar = "changed!";
      console.log("3. beforeMount");
    },
    mounted(){
      this.mountedVar = "changed!";
      console.log("4. mounted");
    },
    beforeUpdate(){
      console.log("5. beforeUpdate");
      // console.log("someUpdate, first: ", this.someUpdate);
      // this.someUpdate++;
      // console.log("someUpdate, second: ", this.someUpdate);
    },
    updated(){
      console.log("6. updated");
      // console.log("someUpdate: ", this.someUpdate);
      // this.someUpdate++;
    },
    methods: {
      updateState(){
        this.someUpdate++;
      }
    }
  }).mount("#app")

</script>
Run the following example to see Vue’s lifecycle hooks in action. Try uncommenting the commented code one line after another, followed by refreshing the page to see the results of the changes to get a practical understanding of the concepts explained above.
For more on Vue’s lifecycle hooks, visit the official docs.
Next
VueJs Components: Reusing Code in Vue
Previous
